|
As we pursue our passion of flying, we often look for ways to get more airtime. As a soaring free flight pilot, I often wondered what paramotoring was like, and if there were any real benefits to even considering learning how to use power. Powered pilots often come to our school to get tuned up and test for their free flight (unpowered) ratings. So what are the benefits of crossing over?
Benefits
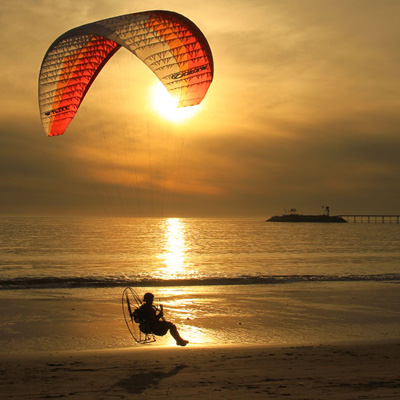
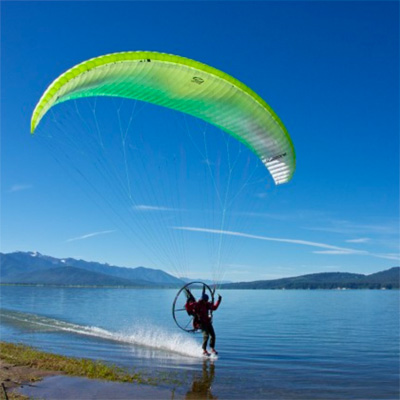
The first and most attractive benefit of crossing over is more airtime! PPG pilots often avoid the midday thermic conditions that make the air more turbulent and bumpy, while PG pilots wait eagerly for the thermals to begin their ascent to the skies before they even set up their gliders. Free flight pilots often use these thermals, plus ridge lift and convergence to fly for hours without power. PPG pilots can fly for hours in smooth conditions with power. A pilot that motors and free flies can fly almost any time of day, choosing power when the air is smooth and free flying when the wind is on the ridge or the thermals are popping!
 Free Flight Benefitting from a Motor
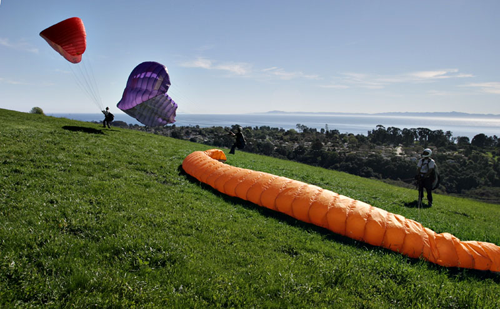
One of my favorite flying sites is where a morning convergence sets up. At this site, the wind switches from straight in to over the back, creqating the perfect but short lived moment to launch into the convergence to free fly for miles. Some pilots get stuck at launch due to being unprepared to launch at the right time before the wind switches to over the back. They will end up chasing the ones that got launched at the perfect time all the way down the valley for 30 miles. If I miss the "switch", with a motor in the trunk I can set up facing the other direction and join the gaggle in the convergence, shutting the motor off once I have climbed into the lift to enjoy the beeping sound of my vario!
Another benefit is the ability of the PPG pilot to evaluate the landing zone before deciding to go on final approach. As a free flight pilot, I have often landed downwind or across the wind line due to active and switchy wind conditions. With my motor, I can simply stay around 200 feet high until I see the conditions are right for my approach. On the other hand, if I have a bad landing while free flying - perhaps sliding into home base on my butt, I won't be replacing a bunch of expensive parts (unless I break bones)!
Sometimes access to the launch area of a great flying site is restricted or prohibited. With a motor, a pilot can launch from miles away and fly to the site and shut the motor off to soar with the birds. Many of the free flying sites are sensitive however, so motor pilots should always check with the local flying community before launching under power from the landing or launch areas. These local pilots have often worked for years to open and maintain good relations with the community to fly at these sites. Don't just show up and power up with out checking the local site protocol. Often I have seen the PPG pilot enjoying their flight much more than the people he is buzzing around down on the ground! Be sensitive and conscientious when motoring, especially flying low or near any person not involved.
 Weather
Both powered and unpowered flight in a paraglider require that the pilot have a basic understanding of weather that is appropriate to fly in. Pilots wanting to soar in thermals or convergence must study the weather a bit more closely to determine safe wind levels and temperature differentials. Learning about the lapse rate and winds aloft forecasts will be essential if one hopes to stay aloft without power unless you are ridge soaring. Choosing appropriate weather to fly in will be one of the most important decisions a paraglider or paramotor pilot will make throughout their flying career.
Setup & Preflight
A free flight pilot has a relatively simple setup and preflight routine compared to a motor pilot, but both need to be thoroughly completed. Setup for both kinds of flight includes:
* check the weather
* checking your glider and lines for wear and tear
* securing all the carabiners - risers to the lines and risers to the harness
* brake toggle knots tied securely
* zip up zippers, check for loose straps
* lanyards on all instruments and radio
* trimmers on your glider adjusted
* speedbar attached properly
* reserve pin attached
* launch path clear and unobstructed
* weather check again!
Motoring pilots will also want to check:
* gas in the tank
* brake length adjusted
* prop guard alignment
* propeller undamaged and tight
* loose clothing and straps out of motor
* kill switch working
* engine warmup
Preflight can be as easy as 123ABCD!
1 - Helmet strap buckled.
2 - Carabiners attached properly to wing.
3 - Harness straps attached and buckled.
A - Air conditions, weather check, wind check, no T-storms, appropriate conditions.
B - Being, check pilot's attitude, health, desire, denial.
C - Clear lines, glider laid out, brakes in proper hands.
D - Do a radio check (includes all instruments).
The above preflight should take no more than 12 seconds, and should be done before each and every flight. If this preflight takes longer that that due to anything found and corrected, do it again from the beginning.
Hooking in
With the motor on your back, it is difficult to lift the lines over the motor to face the glider if you have hooked in facing forward, so having a method for hooking in while facing the glider will be best. While facing the glider, clear both risers so you can see the "A" lines clearly all the way from the wing to the risers and the hook-in loop. Hold both risers flat in your hand next to each other straight from the wing. Fip both risers together in the direction you will turn to launch. Spread and bring each riser to the respective carabiner and hook in. Attach speed bar connections to risers if appropriate, routing them UNDER the reserve bridle if using a front mount reserve.
Inflation
While it is quite easy for a free flight pilot to use the A's and rears to inflate the glider, giving them the ability to subdue the glider quickly and completely with a pull on the rear risers, this is often much more difficult with a motor on your back. Pushing back towards the wind and deflecting the A risers upward usually works best to get the glider overhead. Both disciplines will be well served to have the proper brakes in the hands before the inflation so there is no grabbing for the toggles once the glider is flying.
Kiting
The ability of a pilot to balance the glider overhead while reversed using the proper brakes in wind will directly effect the ability of that pilot to launch and fly smoothly. Kiting skills can be learned and practiced to build confidence and control, both on the ground and in the air. A pilot that can kite well will have the control to execute the launch with precision and skill, not luck. This is perhaps the single most important thing a pilot can practice to increase their chances of success in flying a paraglider, powered or not.
Launching
Here is where the two types of flying are very different. The one common goal is to have as smooth of a transition from inflation - run - flight as possible. If there is a breeze, both can utilize the reverse inflation method, turning when the glider is balanced overhead to launch. In no wind, a forward will be the best method for inflating the glider with or without power, and that's about where the similarities end. With a motor in the mix, the pilot must be completely confident in their attitude and ability before continuing. If you are unsure of your launch and cannot visualize actually getting airborne smoothly, go back and work on basic launch skills - forward and reverse inflations and kiting.
In powered paragliding, the pilot must stay very upright during the launch to fully utilize the thrust being generated by the motor. The best way to do this is to make sure you have a clear, flat, unobstructed launch area faced directly into the wind so you do not have to look where you are running. Now you can look from the horizon up to the center of the leading edge of your wing to balance it directly overhead as you launch. This keeps your head and chin up and back, with your back straight while you apply power and run. PPG pilots can use the power of the motor to press forward, keeping the wing pressurized as they run with the canopy overhead. A bit more power and the pilot will lift off - IF the wing is balanced!
It is also vitally important for the motor pilot to keep their legs down during launch. I cannot tell you how many times I have seen a powered pilot run a few steps, think they have enough lift, pick their legs up and sit down in the seat, only to drag their motor cage through the dirt, sucking rocks and dirt into the prop. Most of the time these launches result in shattered propellers, bent frames and broken bones. These expensive and painful repairs can easily be avoided by simply keeping the legs down during and after the launch, until the pilot is clearly in the air flying. I often ask my students to "drag" their feet at the end of their run as they are leaving the ground. This ensures a complete liftoff without any cage contact with the ground. In the case of a aborted motor launch for any reason, the pilot should immediately kill the engine to avoid getting the lines, glider or body parts into the propeller. Keep in mind that the prop takes a few seconds to stop spinning!
As soon as the powered pilot is launched, it is critical that they keep the throttle steady during the initial climb to 100 - 200 feet. If you slip off the power or kill the motor at 10 feet off the ground, you will pendulum directly into the ground at full speed with no time to flare. A powered pilot must be very smooth with the throttle, keeping the attitude of the glider consistent during launch and climb out. Wait until a safe cruising altitude is reached without the possibility of touching down again before you look for the foot stirrup.
In free flight without power, the pilot will do better to lean on the chest strap as they launch, in the classic "torpedo" position, holding this posture until well into the air before looking for the foot stirrup to get back into the seat. Once the glider is inspected during the inflation, it is unnecessary to continue to look at it. Feel and control the glider overhead by gentle contact with the brake toggles.
Launching should not be done by pulling the brakes to become airborne either way. In free flight, it will usually simply set you back on the ground anyway, but with a motor you could produce a power stall where the combination of thrust from the motor and excessive brake pressure increase the angle of attack too far. Keeping a light touch on the brakes allows the glider to attain the speed it needs to fly, sliding into the air at near trim speed. Remember, the amount you pull and feel pressure in your brakes directly decreases the pressure in the wing by that amount. The wing is most pressurized when flying at trim speed with the brakes all the way up (unless you use a speed bar or trimmers) where the air is flowing across the wing. With a motor, let the motor push you during the run with just enough brake pressure to feel what is happening with the wing.
Room for error? If you do not get launched after three or four attempts with your motor, take a short rest or you will start making mistakes due to fatigue or overheating. Also, if you are unsure, hesitate, or have a bad inflation with or without a motor, just abort and start again. You do not want to "sort it out" once airborne (if you even get there!). You either have the skills to launch and fly your aircraft or you don't, there is no "try and see if I can" in this sport. This brings us around to the subject of certification, which we will cover later in this session. Most paraglider pilots want to fly for the rest of their lives, and not just for the rest of the week! Do everyone a favor and become a proficient pilot.
Propeller Torque
This is something that new PPG pilots will have to pay special attention to. When we apply throttle to the motor, the propeller spins in one direction, exerting force in the other direction on our engine and us as we fly. This has the effect of lowering one shoulder and raising the other, producing a roll or banking turn of the wing to one direction or the other. If the prop spins counter-clockwise as viewed from behind, the resulting turn will be to the right, away from the direction of rotation. You will know exactly what this is like after your very first powered flight!
The best thing a PPG pilot can do is to go with it during climb out if possible - that is, allow the glider to gently turn in the direction it tends toward. One way to do this is to set up in the launch field on the downwind left side, so after launching, almost all the pressure can be kept off the brakes as the aircraft climbs in a gentle right turn to a couple of hundred feet where the pilot can back off on the power and level out at a safe cruise altitude. Remember, any amount of brake you use when at full power is too much brake input! A powered paraglider climbs best with ZERO brake pressure, and if you counter the propeller torque effect, you will very likely stall the wing with disastrous results! The only exception to this is just enough brake input to keep the glider flying straight. If the launching area is restricted in size, pilots must be very careful not to overcontrol the glider during takeoff and climb out.
The amount of propeller torque will be directly related to the amount of available power your motor produces. The more power, the more torque effect and more of a tendency to turn. Pilots can use physical counter measures to counteract the effect, such as hook into a higher carabiner attachment point on one side or use different size carabiners, pack more weight on one side of the harness or use a cross-brace to lift one side of the harness while in flight. While effective, these methods will tend to turn the aircraft in the other direction when not applying throttle. Active countermeasures are techniques that pilots can use while in flight, such as trim one side faster than the other if your risers have trimmers, pushing on one side of the speedbar, counter steering, weightshifting away from the turn, reducing power, or any combination of these. Always plan launches and low passes with an escape to the side the torque turns the wing when under full power!
Landing
As a general rule, landings should be made with the power off. In the event of a stumble, a "dead stick" landing avoids the chance of anything getting caught in the spinning propeller. With a PPG, a pilot has the obvious advantage of being able to go around again, flying a complete circle around the landing area to establish drift or thermal activity, so they can land into the wind. PG pilots must judge their glide carefully to reach a safe landing area, and then plan their approach to execute a perfect final approach. Pilots flying without a motor will do well if they adopt the 'torpedo' posture once again, head forward of the risers leaning on the chest strap with feet down, ready to touch down after the flare.
With a motor on your back, it is quite a challenge to get into the upright position for landing. Motor pilots need to get as upright as possible on their approach, tipping their body forward with their feet down by placing one foot forward and one foot back, using the contact of the rear foot with the ground to roll the pilot forward to catch the weight of the motor. Falling backwards onto the motor in the 'turtle on their back' position is embarrassing and potentially painful and expensive as well, especially if the motor is still running! As soon as the motor pilot has landed, it is good practice to turn 180 degrees immediately and face the wing, backing towards the wind to keep the lines out of the propeller.
Safety
Just being in close proximity to gasoline engines of any type can be potentially harmful or fatal, especially so if the unit is strapped to your back!
The propeller should be carefully respected, especially when throttle is being applied. The tip of the propeller is moving faster than 350 miles per hour, and if it breaks by sucking a rock or stick into it, can cause severe injury or death. Statistically, the greatest risk to the PPG pilot is actually starting the motor! The possibility of the engine going to full power for whatever reason (including leaning on the throttle) makes it easy to stick a hand into the prop. Hold the motor by the frame, not the cage. The vast majority of all serious accidents involve getting limbs in the prop, and they are easily preventable with a bit of respect.
While it is possible for a free flight pilot to hit someone while launching or landing, it is far more likely for a powered paraglider to be dangerous to bystanders or themselves. Observers should be instructed to stay clear during launch and landing, since a sudden turn to one side by the pilot can catch an unsuspecting person in the prop from as far as five feet away! If the pilot falls down during launch or landing, people should not approach until the motor has stopped, since their natural inclination is to run to their aid.
While it seems that a powered paraglider can just about fly anywhwere, paramotor pilots always need a safe landing plan. Flying over water, especially low, is a recipe for disaster. Always leave enough altitude for a safe glide back to a safe landing area. The same goes for flying low anywhere with a motor - if you are flying downwind, near power lines, or execute a downwind turn too close to the ground, you may not have the ability to avoid a crash in the event of an unexpected obstruction, miscalculation or motor failure. The speed difference between flying downwind and upwind may be the difference between a minor inconvenience and very serious injury or worse. The difference between a collision at 30 mph and one at 15 mph is four times the injury potential! That can turn a minor incident into a fatality.
Equipment - Motors
While everyone likes to find a bargain when buying almost anything, purchasing a powered paraglider motor based on price alone can be a big mistake. Getting a more expensive unit is not always the best answer either. Do some research and go look at some motors being used and talk to the pilots that fly and work on them. Check out how long the company making the unit has been in business, and how it will be supported locally and nationally for parts and service. Remember - it's not IF it will need work, it's WHEN.
Some motors are easy to start, but others need a second person to pull the starter rope in order to start the engine when cold. Make sure you can easily re-start your motor when it's cold if you plan to shut off the power during flight. An electric start will add some weight to the backpack, but it can be a welcome tool for larger motors that are difficult to re-start when flying.
Another thing to consider, especially if you are a free flight pilot considering using a motor, is that most motors will have the harness attached to the motor frame. This makes it quite difficult to seat steer the glider in flight, a technique commonly used when free flying. Some motors use a moveable bar suspension, allowing the pilot to lean one way or the other to help steer the glider, but this bar is still attached to the motor frame, and is thus rather stiff to weight shift. Another system uses a "J" bar that is completely separate from the harness and the motor. It is very much like a tandem spreader bar, separating the pilot and motor hook-in points, so the pilot is able to lean independently of the motor, excellent for offsetting motor torque during climbout or thermalling with the motor off.
Heavy motors are not necessarily better! I have seen pilots buy what they thought was the best motor available, only to find that it was a 110lb behemoth, and they were unable to launch it before they were exhausted. A good motor should weigh under 75 lbs dry, or you will be fighting to get launched.
Glider
If you want to be able to fly your glider both with power and without, you will need to look carefully at a few things. Some gliders are suitable to be used for both powered and free flight, but many are not. First, is the wing certified for beginner, intermediate or advanced pilots? We have noticed a trend in recent times for dealers to offer wings that are uncertified, sometimes without a placard or even a weight range listed. Be wary when given the explanation that the glider is a copy of another certified glider, as any change as simple as material, lines or sewing can completely change a glider's characteristics. Shopping for a bargain glider could be the most expensive mistake you will ever make. Manufacturers have spent years designing and testing gliders for safety and performance. The DHV is the 'consumer reports' of the paraglider world, and will give gliders a rating based on their ability to recover from collapses. Without certification, a glider's reactions may be unpredictable, not something to trust your life with.
Next is the weight range of the wing. Most gliders give all-up weight on their placard - that is, the weight of you standing on the scale with your entire kit - wing, harness, reserve, clothes, boots, everything you will be flying with. Usually, a wing will take another 20kg when the motor is used, meaning you can extend the upper weight range by 20kg. Some wings are DULV certified, and the weight range is shown on the placard for motor use.
Some wings are made for motor use only, and do not perform well when flown without power. Remember, with a motor, you don't really need a wing with a great glide, since you have power! Some of these have the glide ratio of a refrigerator, and are not very useful for free flight.
Some manufacturers make motor risers that can be retrofitted to gliders, adding trim tabs for adjusting speed and/or lowering the brake position for easier reach. Make sure that the risers are compatible with the particular glider you wish to add them to.
Price
Free flight pilots looking to cross over to paramotoring can expect to spend as much again as they did for their basic gear and training. Motor pilots will usually need a free flight harness, reserve parachute and Novice Pilot Certification to fly at most free flight launches in the US.
Physical Fitness
Free flight takes little physical strength, and women often do better than men on their first day of learning to fly due to the fact that they do not "muscle" the glider around. They tend to be gentler in the controls, a trait that will serve all paraglider pilots very well. Powered paragliding on the other hand, takes a good deal of strength to complete all the steps necessary to produce a good launch. After a few launch attempts, even a very strong individual will be too exhausted to launch safely without a rest. A possible alternative to this is to use a trike for launching, but only in light winds, since you cannot move laterally with the wing to balance it in wind.
Tandem
The FAA exemption held by USHGA is for unpowered tandem instructional flight only. The ASC can give a pilot the tandem exemption for powered pilots that have completed the necessary requirements. Simply buying a tandem motor and setup does not allow you to perform flights with a passenger - you must be properly trained and rated as a Tandem Instructor, or you are operating illegally as described by the FAA. "(quote from FAA sport pilot)"
Airspace
While both powered and unpowered pilots must pay careful attention to avoiding restricted airspace, the ability of a paramotor pilot to launch and fly from anywhere makes it easier to violate without careful study of airport charts. Their ability to climb into the air makes them more vulnerable to getting into trouble unless they verify that where they are flying is away form airports and approach corridors. Remember that we cannot fly over a congested area at ANY altitude!
Photography & Videography
Many pilots plan to do photography and video while they fly. Some are quite good at this, but keep in mind that whenever you are snapping that picture or aiming the video camera, you are not usually feeling the glider as you fly. In thermic air, paragliders are prone to collapses if not flown actively. Free flying close to a hill or cliff, even in smooth ridge lift, a pilot must be careful not to catch a wingtip on a tree branch or rock outcropping. Using a camera of any sort must be done very carefully in these scenarios.
Using a motor to fly for photo or video work in smooth air can be very productive. A pilot can climb to a safe cruising altitude, put their motor on cruise control (constant engine RPM), and use their camera easily while they fly. Often there is no need to keep the hands on the brakes when the air is smooth, and a bit of leaning can direct the flight in the direction the pilot wants to go. Still, pilots need to heed the prime directive of all of aviation, "See and Avoid", at all times.
Pilot Certification
Getting good training can save a new pilot from costly and painful mistakes, since a good instructor can often rectify a potential problem before it starts. Having the student on the radio during the first solo flights can be helpful when the student gives bad input to the wing, heads for a rotor or approaches a landing off the wind line. Until the student pilot has the knowledge to safely operate the paraglider, the instructor will provide the foundation for safe flight with supervision and instruction. When the new pilot has shown the skills and understanding necessary to become certified, they will be tested and then graduate to unsupervised flight. Even crossing over can present challenges, many of the skills needed for one are distinctly different when learning the other. Often, an experienced pilot will only need a day or two with a qualified instructor to master the necessary new skills to be proficient.
Summary
In closing, flying a paraglider is one of the most incredible activities that we can engage in. Pilots that already know one type can cross over, taking advantage of the abilities they have to enjoy more airtime, expanding their horizons of flight.